ربط واتساب بمنصة خبير
اجعل مساعدك الذكي يرد على عملائك مباشرةً عبر WhatsApp Business — بإعداد واحد موجّه تنجزه مرة واحدة.
هذا الدليل يأخذك خطوة بخطوة لإنشاء حساب Meta Business، وتسجيل رقم واتساب الخاص بنشاطك، وتوليد توكن الوصول الذي تحتاجه منصة خبير لتشغيل الوكيل على واتساب. كل الحسابات والرقم والتوكن تبقى ملكك أنت.
- حساب Facebook لصاحب النشاط (الدخول يتم عبره، ولا حاجة لتوثيقه).
- رقم موبايل للتحقق لتفعيل حساب المطوّر عبر SMS — يُفضّل رقمك الشخصي.
- رقم مخصّص لواتساب لا يوجد عليه حساب واتساب فعّال (سيُفصل عن التطبيق بعد التسجيل)، ويستقبل SMS أو مكالمة.
- معلومات النشاط: اسم العرض، تصنيف، رابط موقع أو سوشال، إيميل.
- بطاقة دفع (ائتمان/خصم) تُضاف لحساب واتساب — يطلبها Meta لتفعيل الإرسال.
لا يلزم توثيق Meta ولا أوراق رسمية. الرد على العملاء الذين يراسلونك أولاً مجاني حتى ١٠٠٠ محادثة شهرياً، لكن Meta تطلب إضافة بطاقة دفع لتفعيل الإرسال.
١) إنشاء حساب Meta Business
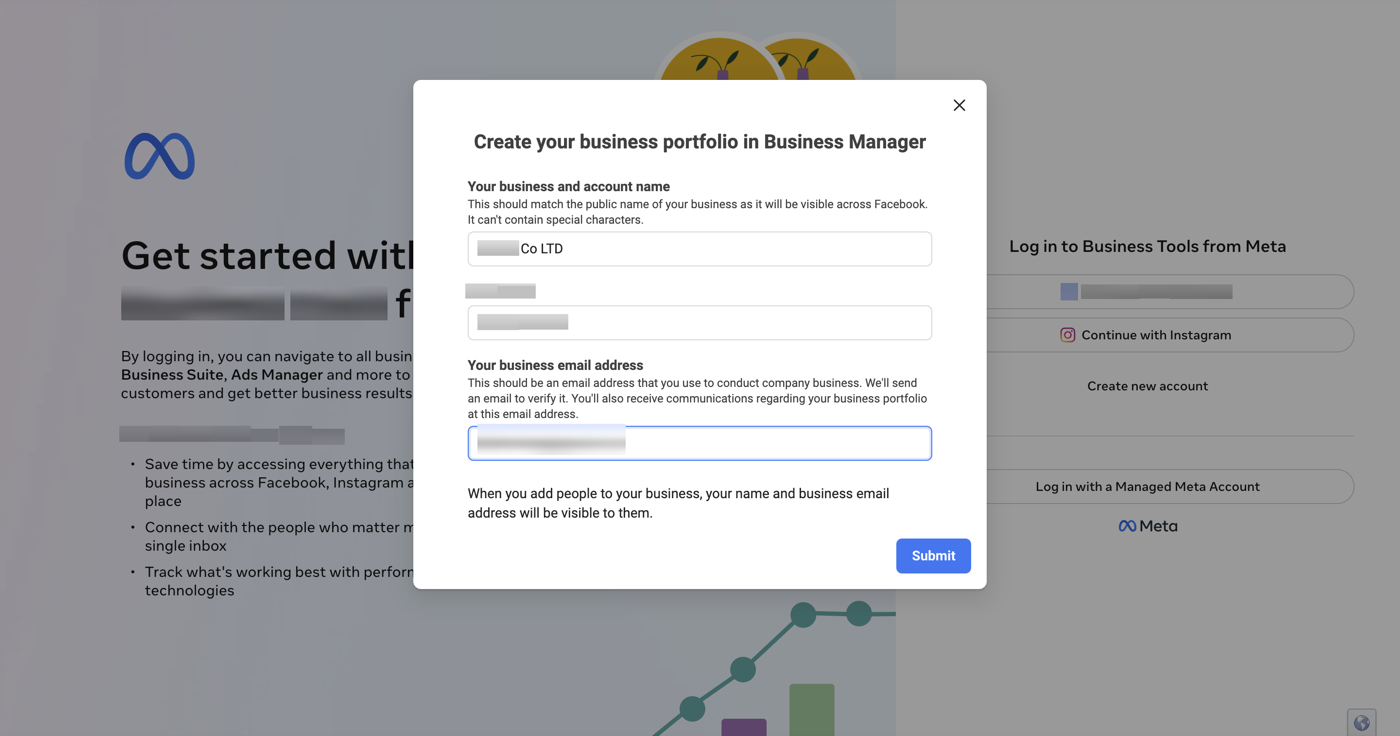
افتح business.facebook.com وسجّل الدخول بحساب Facebook. تظهر نافذة إنشاء حساب النشاط — املأ اسم النشاط، اسمك، والبريد التجاري، ثم اضغط Submit.
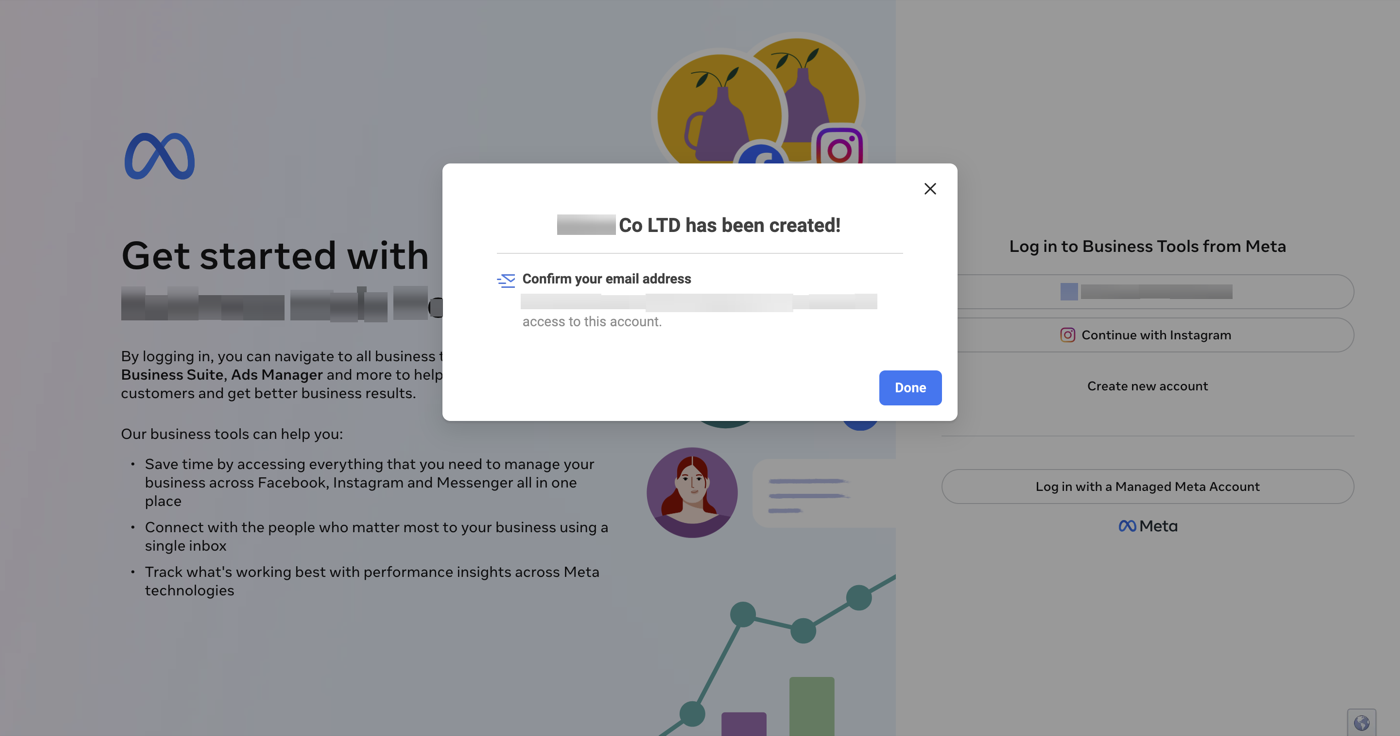
بعد الإنشاء، أكّد بريدك من الرسالة التي تصلك من Meta، ثم ادخل إلى Meta Business Suite.
٢) تفعيل حساب المطوّر
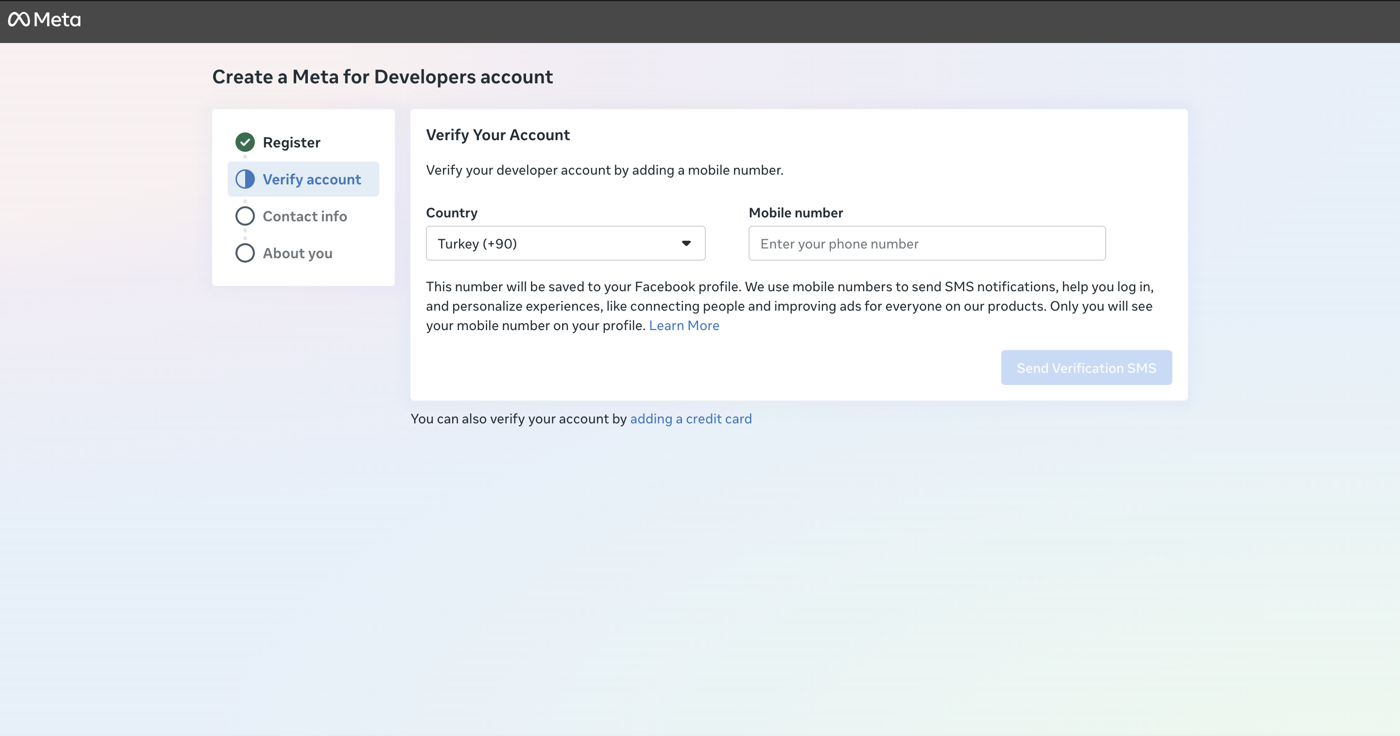
افتح developers.facebook.com واضغط Get Started. أضف رقم موبايل للتحقق، أدخل الكود المكوّن من 6 أرقام، أكّد بريدك، واختر الدور Owner/founder ثم أكمل التسجيل.
٣) إنشاء التطبيق وربط واتساب
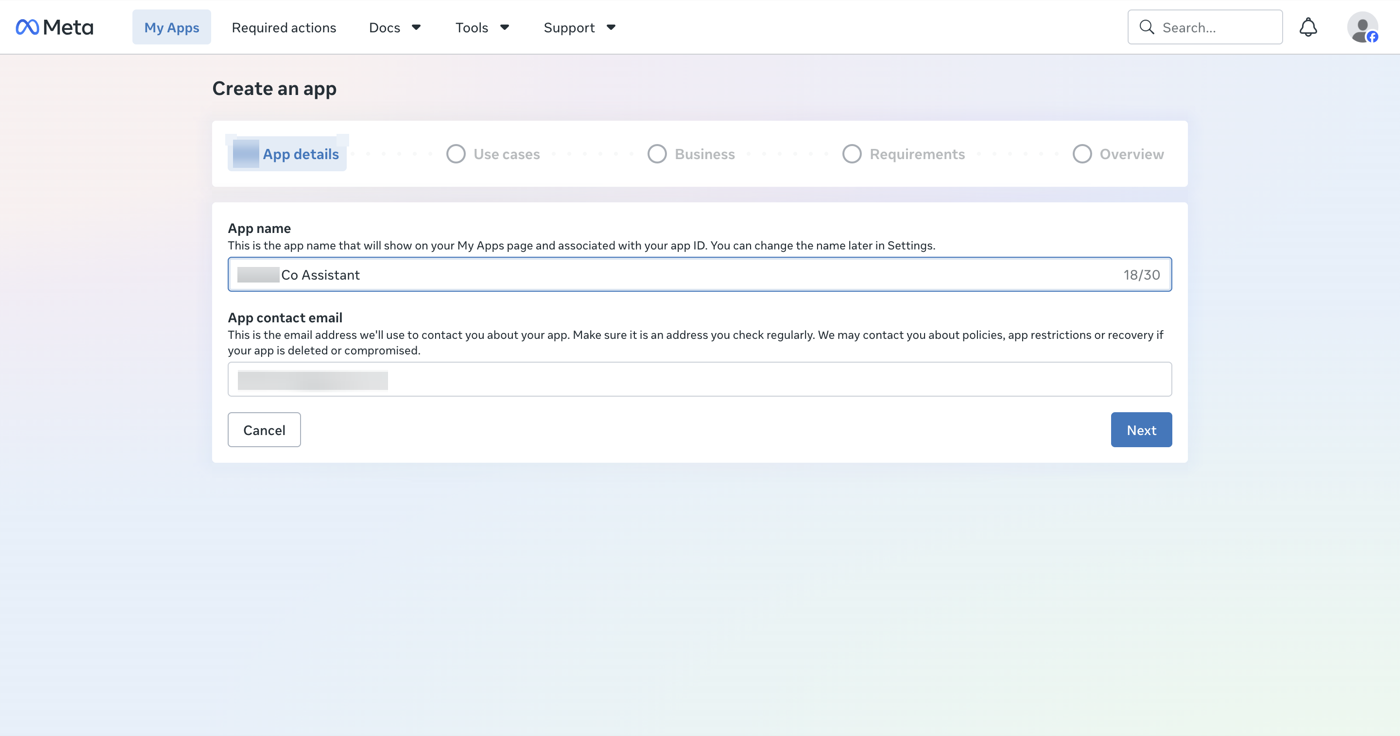
من My Apps اضغط Create App، اكتب اسم التطبيق والبريد، ثم اختر حالة الاستخدام Connect with customers through WhatsApp، واربط حساب النشاط الذي أنشأته.
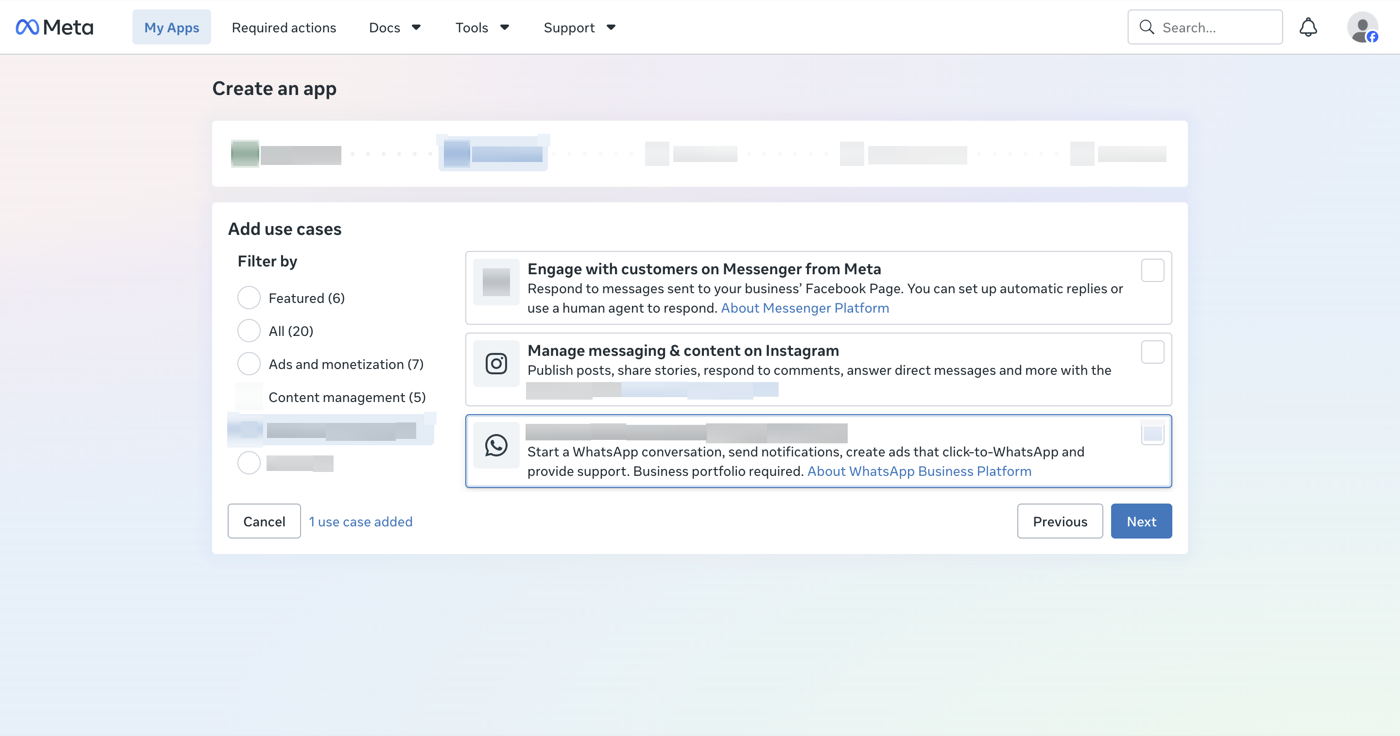
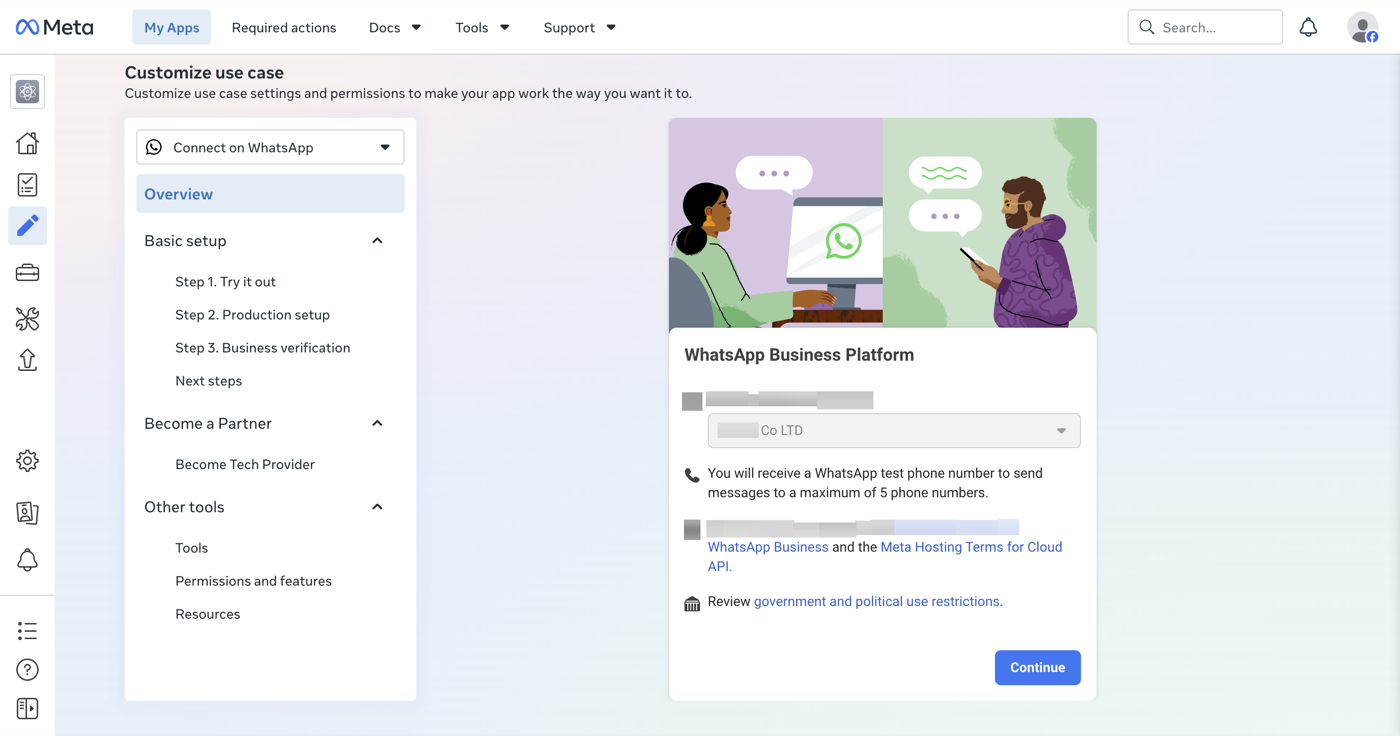
من صفحة تخصيص حالة الاستخدام، اختر حساب النشاط واضغط Continue — يُنشأ حساب WhatsApp Business (WABA) ورقم تجريبي مجاني.
٤) تجربة الرقم التجريبي (اختياري)
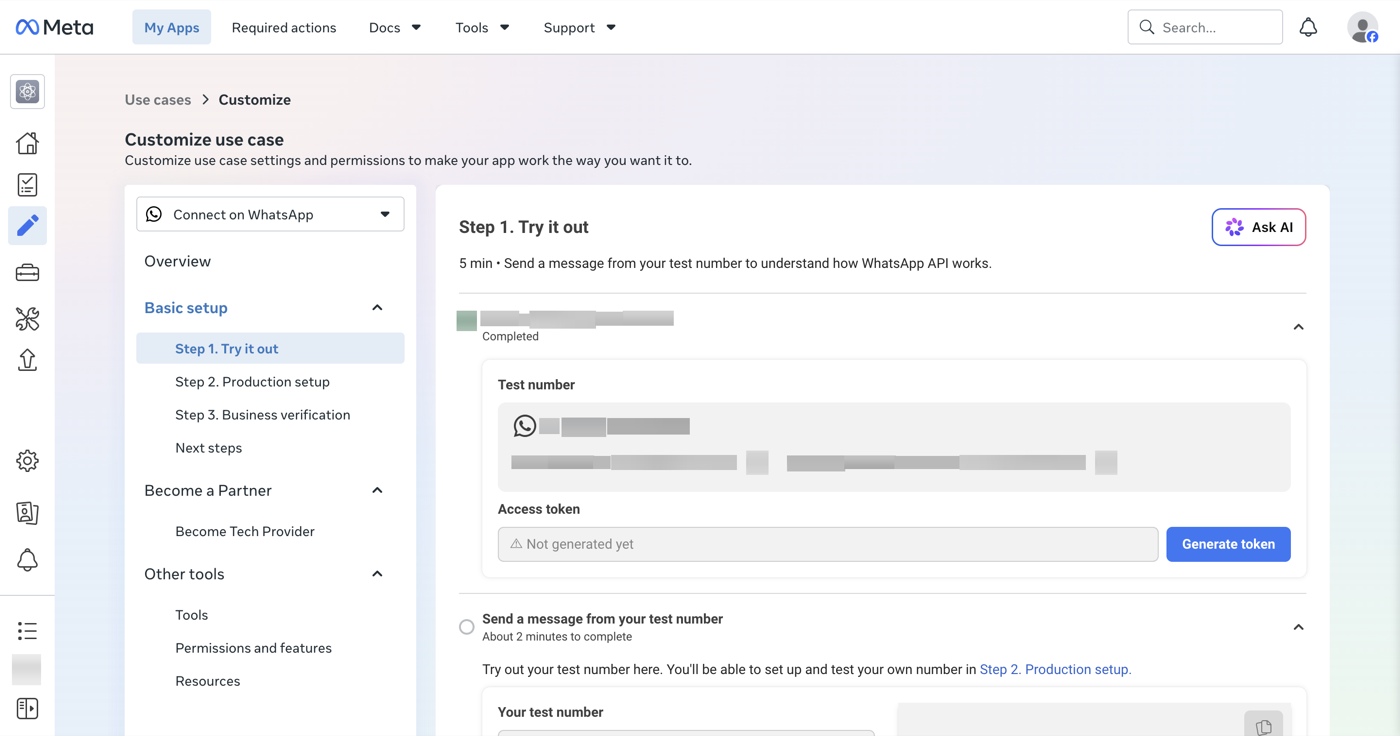
من Step 1. Try it out يظهر الرقم التجريبي مع معرّفاته. أضف رقم واتساب مستلِم للاختبار وأرسل رسالة تجريبية لتفهم كيف تعمل الواجهة قبل رقمك الحقيقي.
٥) تسجيل رقمك الحقيقي
انتقل إلى Step 2. Production setup ← Register your WhatsApp phone number ← Add new number.
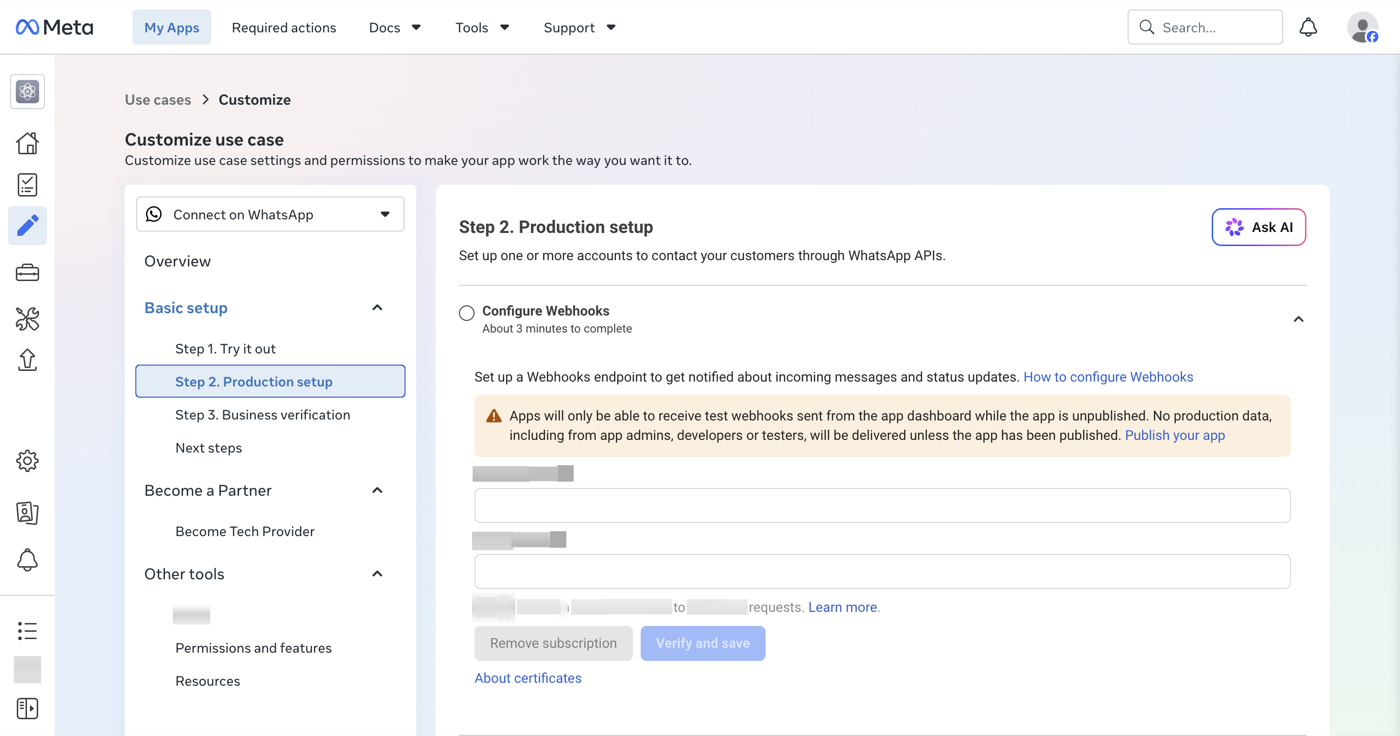
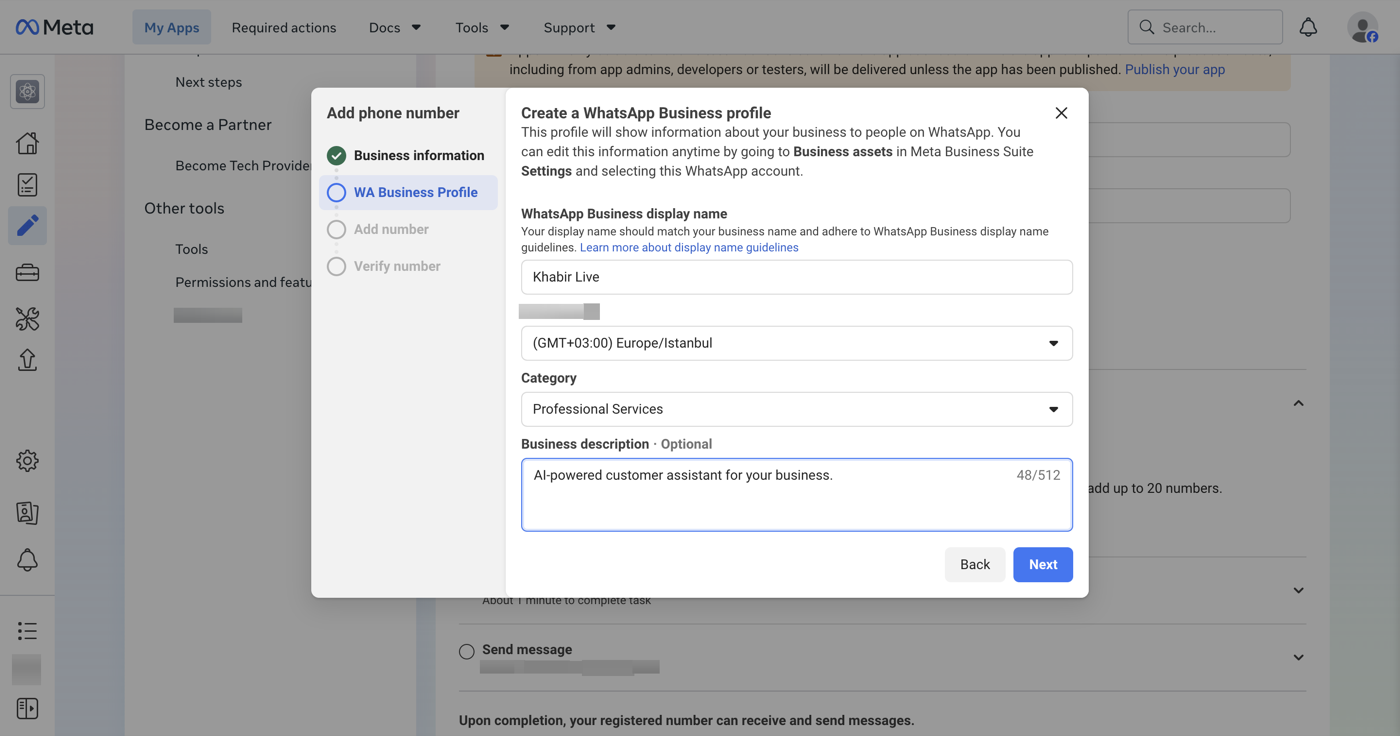
املأ معلومات النشاط، ثم بيانات بروفايل واتساب: اسم العرض (يظهر لعملائك)، المنطقة الزمنية، والتصنيف.
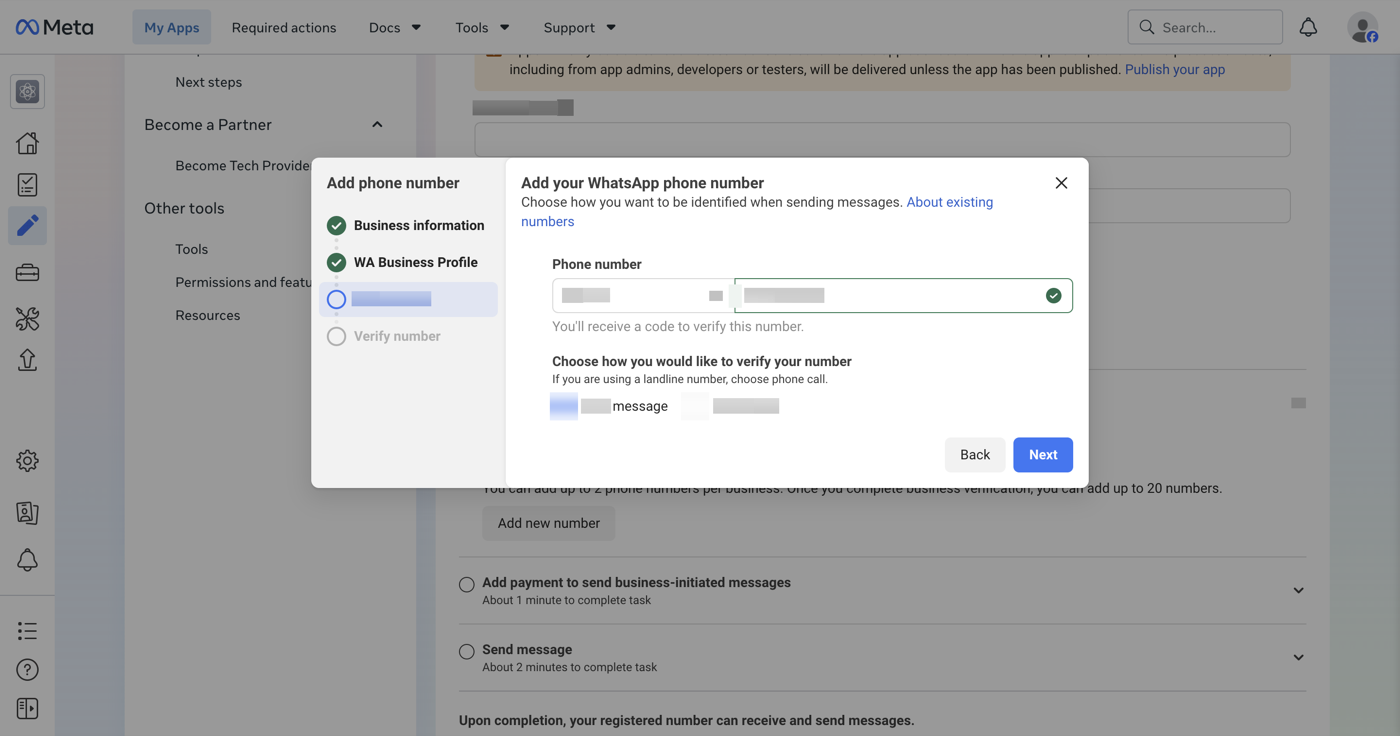
أدخل رقمك الحقيقي واختر طريقة التحقق (رسالة نصية أو مكالمة).
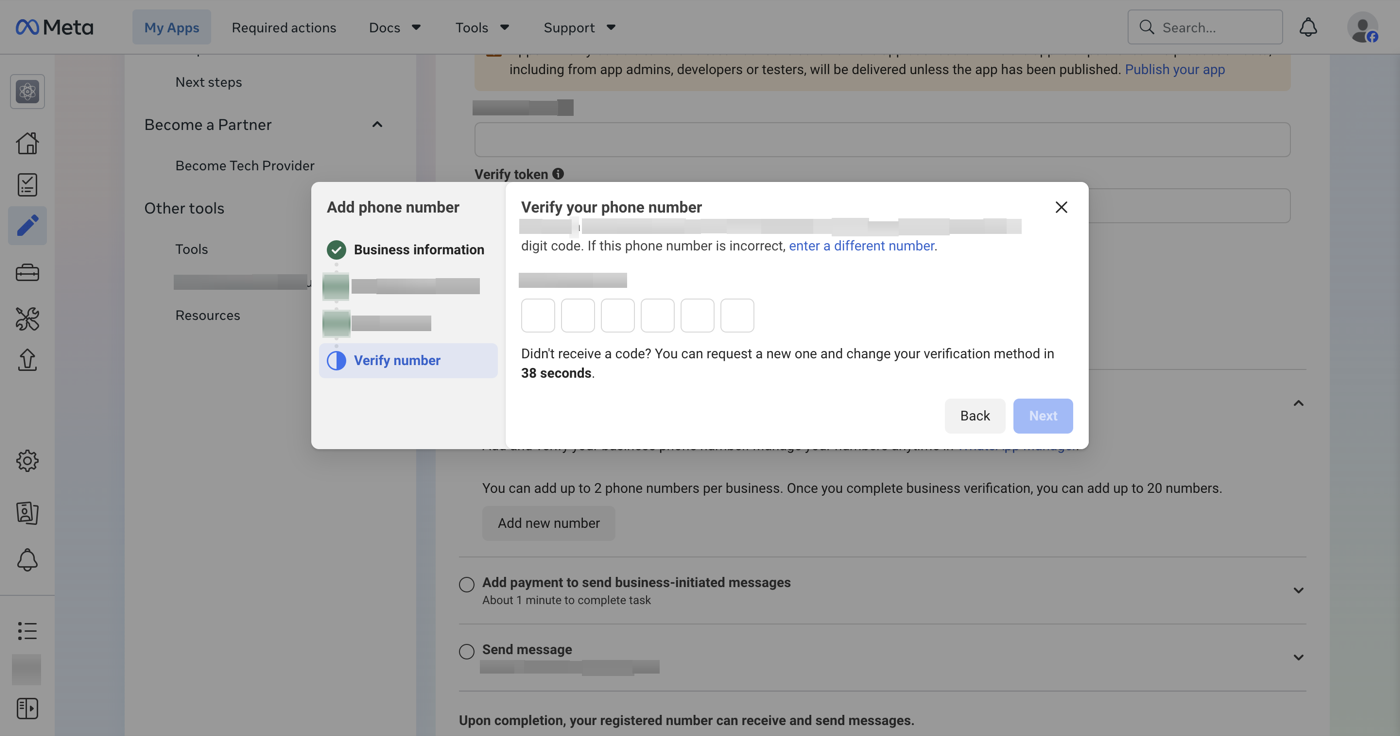
أدخل الكود المكوّن من 6 أرقام الذي يصلك، ثم اضغط Register.
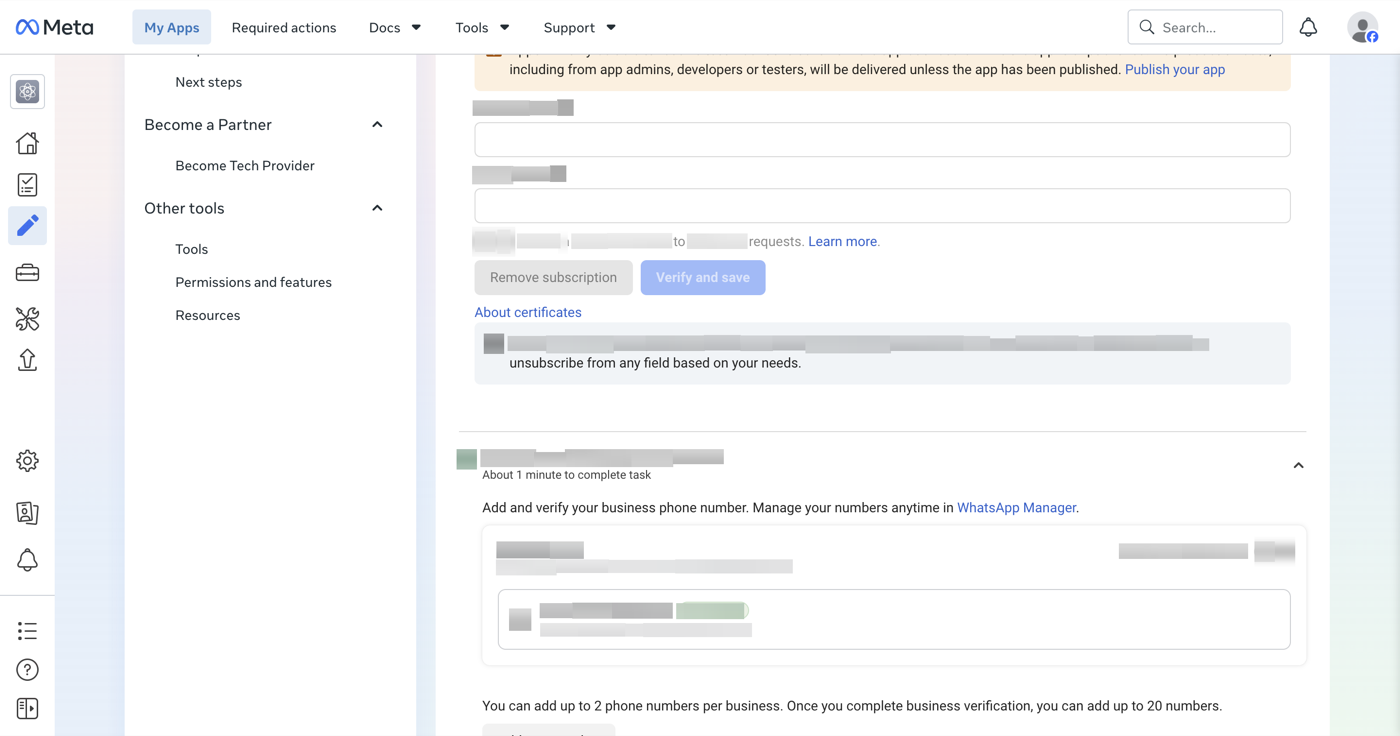
بعد التسجيل تصبح حالة الرقم Registered — جاهز للإرسال والاستقبال.
٦) توليد توكن الوصول الدائم
من Business Settings → System users أنشئ مستخدم نظام (System User) بدور Admin.
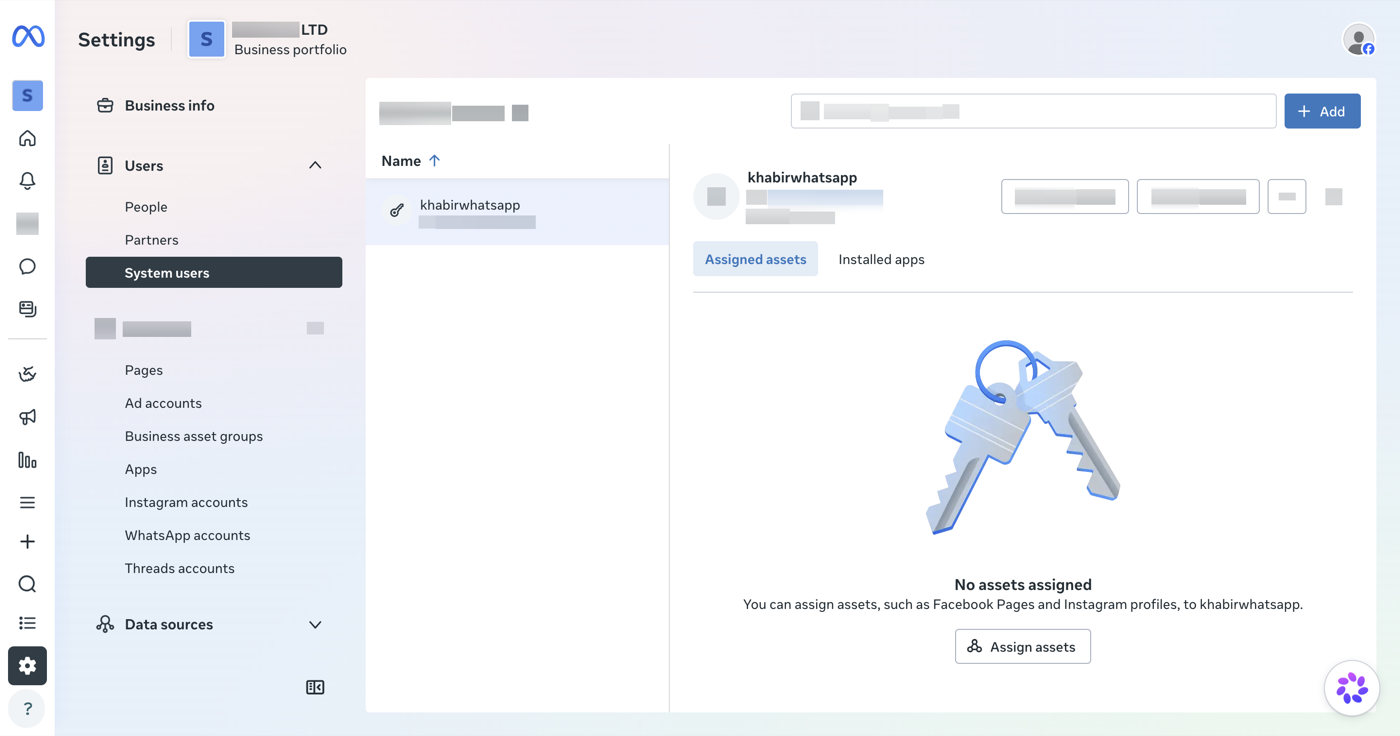
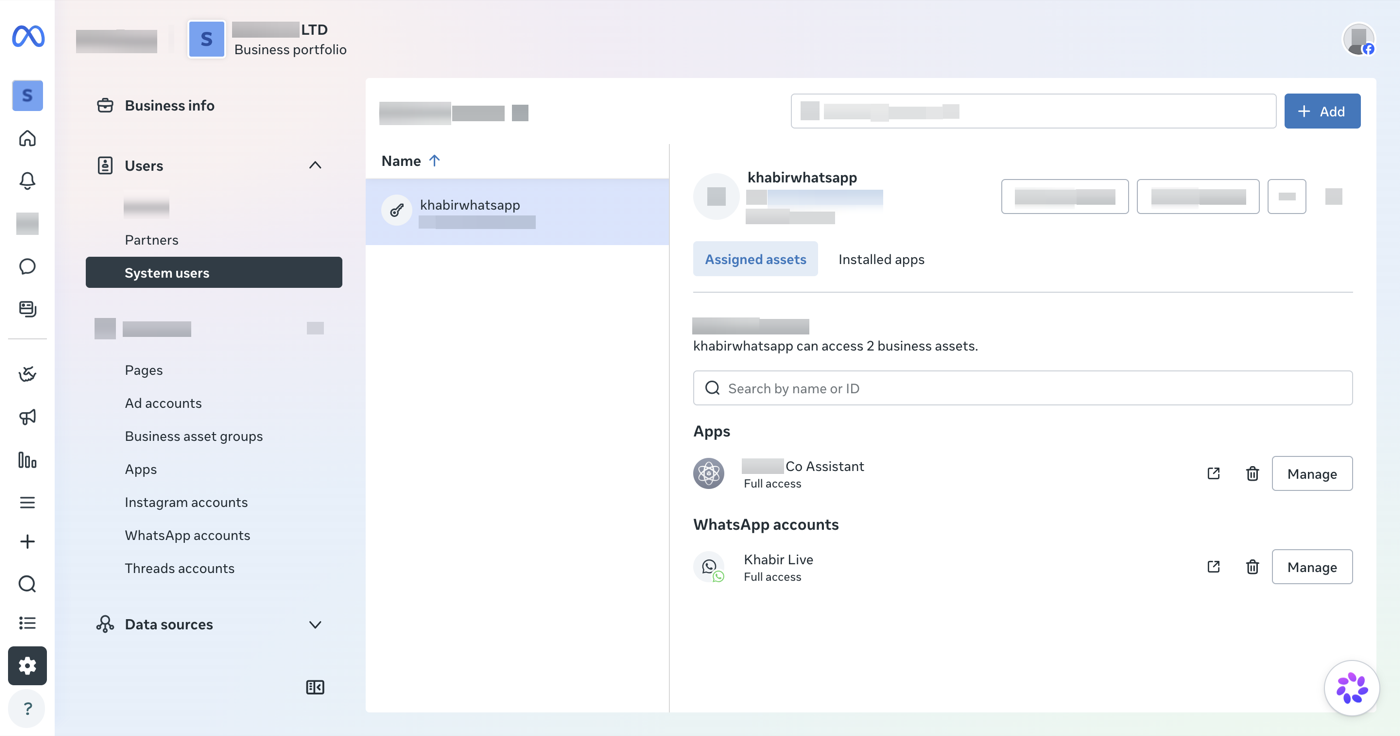
عيّن له أصلين: التطبيق وحساب واتساب، بصلاحية كاملة — وإلا لن يعمل التوكن.
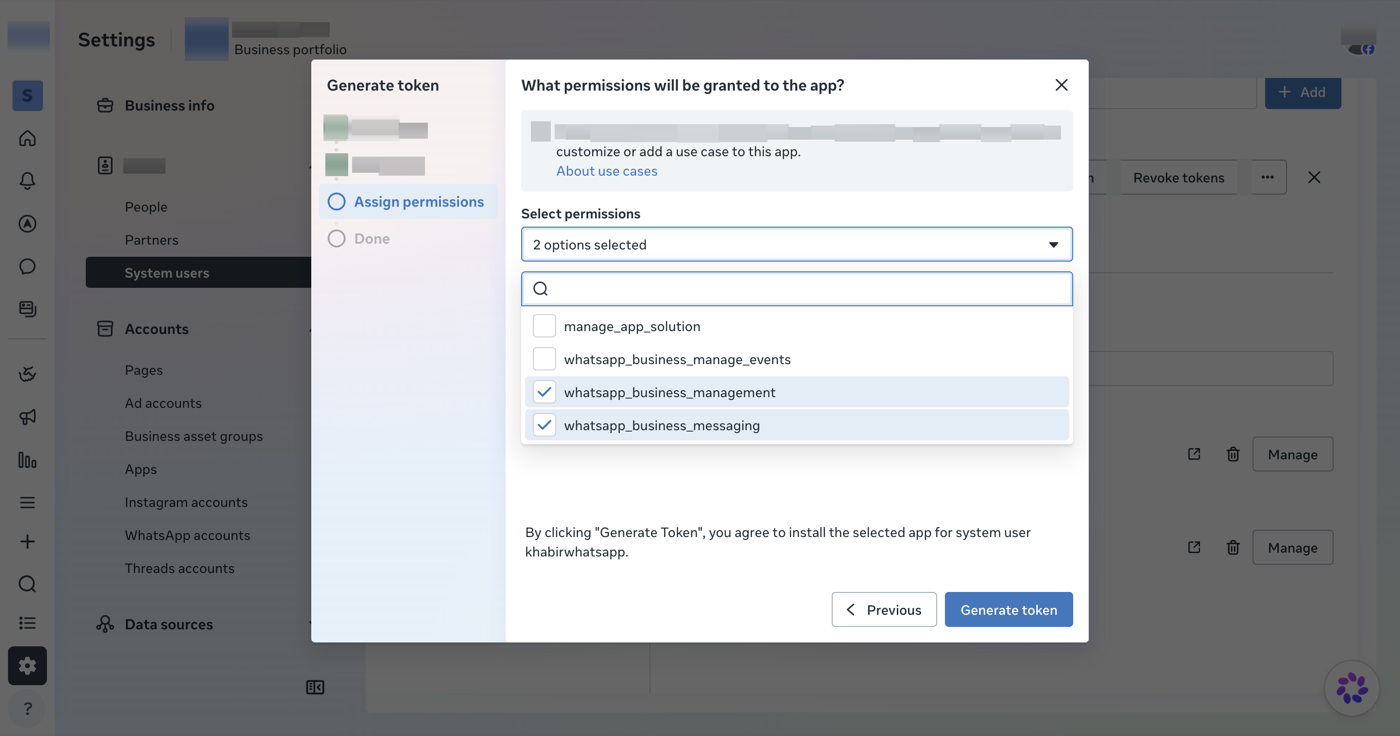
اضغط Generate token، اختر التطبيق، حدّد المدة Never (دائم)، وفعّل الصلاحيتين whatsapp_business_messaging وwhatsapp_business_management.
٧) نشر التطبيق وإضافة بطاقة الدفع
افتراضياً يكون تطبيقك في وضع Development ولا يستطيع مراسلة أرقام حقيقية (تظهر رسالة «API access blocked»). لنشره:
- من App settings → Basic أضف Privacy Policy URL (يمكنك استخدام صفحة الخصوصية لموقعك) ثم احفظ.
- افتح تبويب Publish واضغط Publish — تصبح حالة التطبيق Live.
ثم أضف بطاقة الدفع: من Step 2. Production setup ← Add payment method أدخل بيانات البطاقة واحفظ. الرد على العملاء الذين يبدؤون المحادثة معك مجاني (حتى ١٠٠٠ محادثة خدمة شهرياً)، لكن Meta تطلب وجود بطاقة لتفعيل الإرسال.
الخطوة الأخيرة — الربط من لوحة تحكم خبير
بقيت ثلاث خطوات تنجزها بنفسك من لوحة تحكمك:
- انسخ الـ App Secret: من تطبيقك على ميتا ← Settings → Basic، اضغط Show بجانب App Secret وانسخه.
- اضبط الـ Webhook: في تطبيقك ← WhatsApp → Configuration، ضع Callback URL وVerify token كما يظهران في صفحة «القنوات» بلوحة تحكم خبير، ثم اشترك في حقل
messages(بدّل مفتاح Subscribe إلى الوضع الأخضر). - الصق البيانات: افتح صفحة القنوات في لوحة تحكم خبير، والصق Phone Number ID وWhatsApp Business Account ID وApp Secret ورمز الوصول (Access Token)، ثم اضغط «ربط الرقم» وأرسل رسالة اختبار.
whatsapp_business_management؛ أعد توليده بالصلاحيتين معاً وأعد الربط.
بعدها يبدأ مساعدك بالرد على عملائك عبر واتساب مباشرة — كل شيء يتم من لوحة تحكمك، دون الحاجة لإرسال أي بيانات إلينا.
بعد الربط — ماذا يفعل المساعد على واتساب؟
- يجيب من معرفتك بنفس ذكاء ودجت موقعك وباللهجة نفسها، وتظهر محادثات واتساب في سجل المحادثات مع مرشّح خاص بها.
- يكتب مثل أهل واتساب: تنسيق واتساب الأصلي (عريض ونقاط)، الإجابة الطويلة تصل مقسّمة على رسالتين أو ثلاث متتالية بدل جدار نص واحد، والروابط تظهر ببطاقة معاينة يضغطها العميل مباشرة.
- يلتقط العملاء المهتمين تلقائياً: رقم العميل على واتساب موثّق أصلاً، فبمجرد ظهور نية شراء أو حجز واضحة (إذا كان وضع جمع البيانات «محادثة») يُسجَّل في صفحة العملاء المحتملون باسمه ورقمه — دون أن يُسأل عن أي شيء.
- يحوّل من يطلب إنساناً: إذا طلب العميل التحدث مع شخص، يطمئنه المساعد أن الفريق سيتواصل معه، ويرسل له وسيلة تواصلك المباشرة إن كانت مضبوطة، ويصلك إيميل تنبيه فيه اسمه ورقمه — راجع حين يطلب الزائر إنساناً.
- عند العجز عن الإجابة يضيف المساعد وسيلة تواصلك المباشرة إلى رده حتى لا يصل العميل لطريق مسدود.
صفحات ذات صلة
Connect WhatsApp to Khabir
Let your AI assistant answer customers straight through WhatsApp Business — with a single guided setup you do once.
This guide walks you through creating a Meta Business account, registering your business's WhatsApp number, and generating the access token Khabir needs to run the assistant on WhatsApp. All accounts, the number, and the token stay yours.
- A Facebook account for the business owner (used for login; no verification needed).
- A mobile number for verification to activate the developer account via SMS — your personal number is fine.
- A dedicated WhatsApp number with no active WhatsApp account on it (it detaches from the app after registration) that can receive SMS or a call.
- Business info: display name, category, website/social link, email.
- A payment card (credit/debit) to add to the WhatsApp account — Meta requires it to enable sending.
No Meta verification or legal documents are required. Replying to customers who message you first is free (up to 1,000 conversations/month), but Meta requires a payment card on file to enable sending.
1) Create a Meta Business account
Open business.facebook.com and log in with Facebook. In the create-business dialog, fill your business name, your name, and business email, then press Submit.
After creation, confirm your email from Meta's message, then enter Meta Business Suite.
2) Activate a developer account
Open developers.facebook.com and press Get Started. Add a verification mobile number, enter the 6-digit code, confirm your email, choose the Owner/founder role, and complete registration.
3) Create the app and connect WhatsApp
From My Apps press Create App, enter an app name and email, then pick the Connect with customers through WhatsApp use case and link the business you created.
On the customize page, select the business and press Continue — a WhatsApp Business Account (WABA) and a free test number are created.
4) Try the test number (optional)
Under Step 1. Try it out the test number appears with its IDs. Add a recipient WhatsApp number and send a test message to see how the API behaves before using your real number.
5) Register your real number
Go to Step 2. Production setup → Register your WhatsApp phone number → Add new number.
Fill the business info, then the WhatsApp profile: display name (shown to your customers), timezone, and category.
Enter your real number and choose the verification method (text message or call).
Enter the 6-digit code you receive, then press Register.
After registration the number's status becomes Registered — ready to send and receive.
6) Generate a permanent access token
From Business Settings → System users, create a System User with the Admin role.
Assign it two assets — the app and the WhatsApp account — with full control, or the token won't work.
Press Generate token, pick the app, set expiry to Never, and enable both whatsapp_business_messaging and whatsapp_business_management.
7) Publish the app and add a payment card
By default your app is in Development mode and can't message real numbers (you'll see an "API access blocked" error). To publish it:
- In App settings → Basic, add a Privacy Policy URL (your website's privacy page works) and save.
- Open the Publish tab and click Publish — the app's status becomes Live.
Then add a payment card: under Step 2. Production setup → Add payment method, enter your card and save. Replying to customers who message you first is free (up to 1,000 service conversations/month), but Meta requires a card on file to enable sending.
Final step — connect from your Khabir dashboard
Three things you do yourself, from your own dashboard:
- Copy your App Secret: in your Meta app → Settings → Basic, click Show next to App Secret and copy it.
- Configure the Webhook: in your app → WhatsApp → Configuration, set the Callback URL and Verify token exactly as shown on the Channels page in your Khabir dashboard, then subscribe to the
messagesfield (flip its Subscribe toggle on). - Paste the details: open the Channels page in your Khabir dashboard and paste your Phone Number ID, WhatsApp Business Account ID, App Secret, and access token, then press "Connect number" and send a test message.
whatsapp_business_management permission; regenerate it with both permissions and reconnect.
Your assistant then replies to customers on WhatsApp — it all happens from your own dashboard, with nothing to send us.
After connecting — what does the assistant do on WhatsApp?
- Answers from your knowledge with the same intelligence as your website widget, in the customer's dialect. WhatsApp conversations show up under Conversations with their own filter.
- Writes like a WhatsApp native: WhatsApp's own formatting (bold and bullet lists), long answers arrive split across two or three consecutive messages instead of one wall of text, and links show a tappable preview card.
- Captures interested customers automatically: a WhatsApp number is already verified, so the moment clear buying or booking intent appears (with lead capture in "Conversational" mode) the customer lands on the Leads page with their name and number — without being asked for anything.
- Routes human requests: if a customer asks to talk to a person, the assistant reassures them the team will follow up, shares your direct contact channel if one is set, and you get an alert email with their name and number — see When a visitor asks for a human.
- On a knowledge gap the assistant appends your direct contact channel to its reply, so the customer never hits a dead end.